Difference between revisions of "Getting Started in Astrophotography"
m (→LEVEL 1) |
m (→Altitude-Azimuth Mounts) |
||
| Line 121: | Line 121: | ||
The simplest type of mount motion is what is known as altitude-azimuth, or alt-az. Altitude refers to the angle above or below the horizon, while azimuth refers to the angle along the horizon, left or right. Azimuth measures usually are given between 0° and 90° Typically, the [[zenith]] is considered 90° altitude and the horizon is 0°. For Azimuth, 0° or 360° is typically due North, 90° is due East, 180° is due South, and 270° is due West. Alt-az coordinates are relative to the observer's position, and for astronomical objects, they are relative to the observer's position on the Earth as well as the time and date of the observation. If a person in New York sees Jupiter at an altitude of 60 degrees above the horizon, to an observer in Chicago, it would only be 45 degrees above the horizon at that time, but will reach 60 degrees about an hour later. | The simplest type of mount motion is what is known as altitude-azimuth, or alt-az. Altitude refers to the angle above or below the horizon, while azimuth refers to the angle along the horizon, left or right. Azimuth measures usually are given between 0° and 90° Typically, the [[zenith]] is considered 90° altitude and the horizon is 0°. For Azimuth, 0° or 360° is typically due North, 90° is due East, 180° is due South, and 270° is due West. Alt-az coordinates are relative to the observer's position, and for astronomical objects, they are relative to the observer's position on the Earth as well as the time and date of the observation. If a person in New York sees Jupiter at an altitude of 60 degrees above the horizon, to an observer in Chicago, it would only be 45 degrees above the horizon at that time, but will reach 60 degrees about an hour later. | ||
| − | Alt-az is intuitive for most people. We liver our lives in a left-right, up-down manner. But for astronomy, this often presents problems. | + | Alt-az is intuitive for most people. We liver our lives in a left-right, up-down manner. But for astronomy, this often presents problems. This is because we live on the surface of a rotating planet that is roughly spherical. While objects in the universe do move, the rate of motion is typically very low, which means they don't appear to be moving at all from our vantage point over the course of minutes, hours, days, or even years. If the Earth was not rotating or orbiting the sun and you were to look up at the night sky, other than things in our solar system, the positions of everything out there would not seem to change at all except over long periods of time. But because the Earth is rotating at a rate of 1 rotation per day, from our vantage point it appears those objects are moving. |
| + | |||
| + | Imagine you are on a merry-go-round and looking out from the center. Everything around you would seem to be moving, circling around you. But, in fact, you're the one moving, not the world around you. This is essentially what's happening with the Earth and the universe around us. | ||
| + | |||
| + | If you follow objects across the sky at night, you'll notice that they don't move in straight lines, but follow paths that arc across the sky - a portion of the full-circle created by the Earth's rotation. If you are in the Northern Hemisphere and a star is rising on the Eastern Horizon, as the star rises you will notice it appear to be moving a bit south as well, until it reaches the [[meridian]]. At that point it will start setting, moving toward the western horizon and appear to be moving slightly north to set at a point 180 degrees from where it rose. In the Southern Hemisphere, the same thing happens only the stars appear to move a bit north as they rise and south as they set. If the star were to draw a line across the sky as it went, this line would be an arc, not a straight line. | ||
| + | |||
| + | And here is where an alt-az mount starts to have difficulties, particularly for photography. In order to move in such a way as to follow as star, or planet, or nebula, or any other astronomical body, the mount must move in both the altitude and azimuth axes at rates that are not only different from one another, but also vary depending on the object's location in the sky. Not only that, but they may change direction in the altitude axis - as they rise the altitude increases, as they set it decreases. | ||
| + | |||
| + | In order for an alt-az mount to "track" - follow - an object across the sky, it must be computerized. In mounts with this functionality, a computer maintains an internal mathematical model of the Earth and the sky. When you start up such a mount, the computer must be initialized (given starting values) for the time and date and its location on the surface of the earth (Latitude, Longitude, and Altitude). Once it knows where it is and what time and day it is, it can determine where everything in the sky should be relative to its position. It then must synchronize the calculated positions with its own orientation. This is typically done by identifying a handful of stars from a list of bright stars, pointing the telescope at one of the stars, and telling it what it's looking at. With two or three such stars, the mount should be relatively accurate and capable of [[slewing]] to a requested set of coordinates. To follow an object, once an object to follow is designated, it must then calculate what it's looking at and how it needs to move to follow the object. This calculation must be done every time it needs to move to follow the object - usually several times per second. | ||
| + | |||
| + | But there's a bit of a problem here: each calculation relies on the results of the previous calculation, which ultimately rely on the initial values entered during setup and alignment. If those values aren't accurate, neither will be the resulting calculation results. And the calculation errors can compound over time. | ||
| + | |||
| + | For the most part, alt-az telescopes simply lack the accuracy to do this well enough for photographic use. There are some exceptions. Imaging that does not require long exposures, such as planetary imaging, may be possible, and there are some very high-end systems that are accurate. These often are significantly more expensive and use computerized-pointing systems based on plate-solving and modeling the unique characteristics of the particular telescope and mount - something known as a [[Tpoint Model]]. | ||
| + | |||
| + | Another problem with alt-az mounts is a problem known as [[frame rotation]]. Frame rotation is the apparent rotation of an object in the field of view as it moves across the sky. To better understand this, consider the following: If you look at the Constellation Orion, the westernmost star on its belt (which rises before the other two belt stars) is named Mintaka. This star is nearly on the celestial equator. The bright star Betelgeuse, which is easily identified by its red-orange color, sits in Orion's eastern "shoulder" which is about seven and one-half degrees north of the equator, which puts it to the left of Mintaka as Orion is rising. The blue-white supergiant Rigel which forms the south-west most "toe" in the constellation is roughly 8 degrees south of the equator, putting it to the right of Mintaka when rising. If you follow the constellation across the sky until it sets, as it is setting you will notice that Betelgeuse is now to the right and Rigel to the left. Betelgeuse is still to the North, and Rigel to the South, but you have rotated 180 degrees to see them set. If you were to follow them the entire night through an alt-az telescope, you'd watch the stars appear to rotate in the field of view. In fact, you are the one rotating as you follow them. | ||
| + | |||
| + | For long exposure imaging, this is a major problem. There are devices available to rotate along with the object as you move across the night sky, but these tend to be somewhat expensive and are not in widespread use. | ||
| + | |||
| + | Overall, this makes alt-az mounts less suited for imaging, and not recommended for those interested in imaging. They are, however, easy to use and often less expensive than the alternative, making them a favorite among visual observers. | ||
| Line 127: | Line 145: | ||
Level 2 | Level 2 | ||
| + | |||
===LEVEL 3=== | ===LEVEL 3=== | ||
Level 3 | Level 3 | ||
Latest revision as of 16:15, 20 January 2020
NOTE: this is a page in progress
A lot of people have at least a casual interest in Astrophotography (abbreviated AP). But most people know very little about how AP is done, or what it even is. Many seem to think it's as simple as just plugging a camera into the eyepiece receptacle of a telescope and snapping pictures. In reality, it's far more complex than that.
Contents
What is Astrophotography
At its heart, AP is about taking pictures of astronomical phenomena. This can be anything from images of the stars at night to images of galaxies and nebulae, and a whole bunch of stuff in-between.
Astrophotography is not a monolithic subject. There are a wide variety of sub-topics in AP, and each have different needs. There's no one-size-fits-all solution. But there is often a lot of overlap.
Let's break down the different kinds of AP:
Kinds of Astrophotography
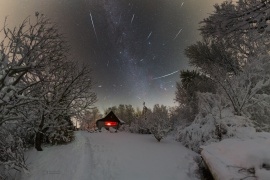
Star Trail Photography
This has been a traditional starting point for many astrophotographers and has the least-demanding requirements. Typically all that is needed here is a camera which offers you the ability to capture long exposures and a tripod or some other mount to hold it still.
The bulk of star trail images are taken toward the pole, which shows the rest of the sky turning around the pole itself. Some nightscape images (see below) use star-trail images instead of fixed-star images.
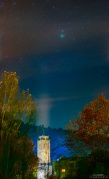
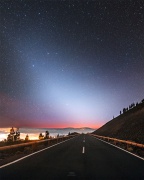
Nightscape Photography
Nightscape photography is the type of astrophotography that combines scenery/landscape photography with the night sky overhead.
- Examples of Nightscape Photography From APOD
12/07/2018
12/18/2018
01/24/2019

05/16/2019
07/24/2019
Nightscape photography is primarily done with DSLR cameras, non-tracking tripods, and standard lenses with short focal lengths.
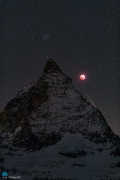
Lunar Photography
As the name suggests, this would be pictures of the moon.
Other than the sun, the moon is the brightest of all astrophotography targets. It's also relatively large. Long exposure imaging is not required for lunar photography, so a tracking mount is not required, though it is generally recommended. The preferred method for lunar photography is done via stacking video frames and processing to produce the most detail.
Planetary Photography
Again, as the name suggests, we're talking about pictures of planets here.
For the most part, however, there are only three planets that make good targets for photography: Mars, Jupiter, and Saturn.
•Mercury is too close to the sun, and too small. At its [maximum elongation], it only gets about 19° from the sun, which means that it's never visible far above the horizon. Because of this, any imaging will end up shooting through a thicker air mass, which typically degrades the image significantly. It's also so small that you're not going to see much anyway it its distance. Nevertheless, some people do attempt pictures. In them the most you are likely to see is the phases it displays, similar to those of the moon.
•Venus is not as close to the sun as is Mercury, but, being inside our orbit, it still doesn't rise all that high. At [maximum elongation], it only gets about 45° above the horizon. Venus is also fairly featureless, other than showing phases. The clouds block any surface features, and the patterns in the clouds themselves tend to be fairly subtle. Typically you would need a neutral density filter to reduce the glare, then another filter (I believe violet is the one of choice) to increase contrast enough to make out the features.
•Uranus is too distant and small to show much more than a blue-green disk to most amateur telescopes. Larger amateur scopes can occasionally get more out of it, but rarely.
•Neptune is about the same size as Uranus, but further out still, making any reasonable hope for capturing an image of Neptune somewhat hopeless.
•And if you count Pluto as a planet, just consider that the best image the HST could get is this:

As for extra solar planets: only the largest research telescopes have ever captured direct images of the most massive and nearby such stars. Your amateur scope has no real hope of imaging them, though detecting them is possible.
Comet Photography
Comet astrophotography comes along with some unusual challenges.
There are actually two different kinds of comet astrophotography. The first kind is primarily used for discovering comets. The other is to produce an image of the comet.
Photography for discovering comets - which can also be used for discovering asteroids or even Kuiper Belt Objects (KBOs) and was also the technique used to discover Pluto - involves capturing multiple images of the same patch of sky over time. It can be done during a single imaging session or over several. The images are then compared in an effort to identify any objects that appear to move between the images. The discovery of Pluto utilized a device called a Blink Comparator, which rapidly shifted between images. Today, typically images are merged and a moving object will show up in multiple positions, typically forming a line as it moves through the image.
For capturing detailed images of a comet, the primary challenge comes with the fact that the comet is usually moving at a different rate than the background stars. The closer the comet is to the Earth, the more apparent motion there will be between the comet and the background stars. Sometimes it may take days to notice much of a change, particularly when a comet is far away. Other times, particularly when closest, the movement may seem obvious over minutes or seconds. In a case like this, if trying to capture a long-exposure image, normal tracking at the sidereal rate will show the stars as you would normally expect to see them, but the comet may appear to be a stretched blur. If you were to track the comet directly, the comet may come out clear, but then the background stars would end up in a blur.
For this reason, special techniques are used for this kind of imaging.
Solar Photography
Due to the intensity of the energy involved, solar photography requires some form of filtering to avoid damaging the camera and/or telescope. As with lunar and planetary imaging, exposure times are very short, so mount selection is far less critical. But the filtration option itself can be expensive, depending on the type of solar filtering used.
There are two main types of solar filters: so-called "White Light" filters and Hα filters.
White-light filters are fairly inexpensive, but also show the least. A white light solar filter will allow you to see sunspots, transits, and possibly solar granulation (though not clearly).
Hα filters are a whole different ballgame. These combine an energy rejection filter with an etalon which allows for a very narrow bandwidth of light to be viewed. This allows the viewer to see a lot more detail at a specific wavelength of light. This allows the user to see things such as solar prominences (these are frequently, though incorrectly, referred to as solar flares, but flares are a much larger feature). There are other, similar filters for different wavelengths. Calcium K is the second most common such filter, though the vast majority of narrow-band solar filters for amateurs are Hα.
Deep Sky Photography
The biggest challenges in AP come with deep sky astrophotography, or DSO AP. There are two key inter-related reasons for this.
The Earth rotates on its axis once every 24 hours. When you factor in the additional movement caused by the Earth's orbit around the sun, the actual apparent rate of motion of astronomical objects in the sky is about 4 minutes short of 24 hours. This is the sidereal rate.
DSO targets include galaxies, nebulae, and star clusters. Each of those can, of course, be sub-divided.
The easiest overall division here to use is by Angular Measure. Targets which require a wider field of view (for example NGC 7000, the North America Nebula M31, the Andromeda Galaxy, and the Veil Nebula), typically require telescopes with shorter focal lengths, cameras with larger image sensors, and are less demanding on the tracking accuracy of the mount.
On the other hand, objects with smaller angular measurements, such as most planetary nebulae and many galaxies, typically need more magnification. This requires longer focal lengths and/or smaller image sensors. This, in turn, decreases the width of the field of view, which puts greater demands on the mount's tracking accuracy. Even with autoguiding, many mounts are simply not well suited to this task.
Equipment
For any kind of astrophotography, there are three main pieces of equipment needed:
- the Camera
- the Telescope or other optics
- the Mount
Different types of AP have different requirements, and those requirements will depend on the specific needs of the type of AP being done.
Telescope Mounts
For most types of astrophotography, the mount is, without question, the most important piece of equipment. For Lunar and Planetary astrophotography, it's not as critical, and for Star Trail and Nightscape photography, it's not very important at all (you still need SOMETHING to hold the camera, however). But for deep sky astrophotography of any sort, it is absolutely critical.
When it comes to deep sky astrophotography, you could have a million-dollar top-of-the-line camera and a million-dollar top-of-the-line telescope, but without a mount that can handle the load and provide accurate motion, you will not get good images. Conversely, a mediocre telescope and camera on a quality mount can often produce pretty good images. For this reason, it is always recommended that you focus on the mount first, then payload second.
The reason this is so critical is due to the apparent motion of the sky caused by the rotation of the Earth on its axis and the requirement of long exposures to capture an image of the object being photographed. If, during the duration of the exposure, the object moves with relation to the camera and telescope, the image will show blurring and stretching or streaking. The job of the mount is to counteract this motion.
The term mount refers to the overall piece of equipment that holds up the telescope and/or camera and is used to point/aim them at a particular object. People not familiar with the workings of telescopes often refer to mounts as tripods. Many telescope mounts do use tripods, but not all. The tripod is not the key portion of the mount. What a tripod is is a type of support structure for the portion of the mount that does the work of pointing the telescope, which is referred to as the mount head. A mount head and tripod or other support structure (such as a pier), together make up the mount, though the mount head itself is often simply referred to as the mount.
(note: insert image here of the iOptron iEQ45 Pro mount head alone, with tripod, and with pier. Also insert a picture of a camera tripod and a Dobsonian base.)
In order to move (or slew) the telescope to point at an object, the mount must be able to move in two or more axes of motion (not, here the term axes does not refer to what you use to chop firewood, but as the plural of axis). There are two common types of motion used for telescope mounts, and mounts can be broken down into two groups based on those types of motion.
Altitude-Azimuth Mounts
The simplest type of mount motion is what is known as altitude-azimuth, or alt-az. Altitude refers to the angle above or below the horizon, while azimuth refers to the angle along the horizon, left or right. Azimuth measures usually are given between 0° and 90° Typically, the zenith is considered 90° altitude and the horizon is 0°. For Azimuth, 0° or 360° is typically due North, 90° is due East, 180° is due South, and 270° is due West. Alt-az coordinates are relative to the observer's position, and for astronomical objects, they are relative to the observer's position on the Earth as well as the time and date of the observation. If a person in New York sees Jupiter at an altitude of 60 degrees above the horizon, to an observer in Chicago, it would only be 45 degrees above the horizon at that time, but will reach 60 degrees about an hour later.
Alt-az is intuitive for most people. We liver our lives in a left-right, up-down manner. But for astronomy, this often presents problems. This is because we live on the surface of a rotating planet that is roughly spherical. While objects in the universe do move, the rate of motion is typically very low, which means they don't appear to be moving at all from our vantage point over the course of minutes, hours, days, or even years. If the Earth was not rotating or orbiting the sun and you were to look up at the night sky, other than things in our solar system, the positions of everything out there would not seem to change at all except over long periods of time. But because the Earth is rotating at a rate of 1 rotation per day, from our vantage point it appears those objects are moving.
Imagine you are on a merry-go-round and looking out from the center. Everything around you would seem to be moving, circling around you. But, in fact, you're the one moving, not the world around you. This is essentially what's happening with the Earth and the universe around us.
If you follow objects across the sky at night, you'll notice that they don't move in straight lines, but follow paths that arc across the sky - a portion of the full-circle created by the Earth's rotation. If you are in the Northern Hemisphere and a star is rising on the Eastern Horizon, as the star rises you will notice it appear to be moving a bit south as well, until it reaches the meridian. At that point it will start setting, moving toward the western horizon and appear to be moving slightly north to set at a point 180 degrees from where it rose. In the Southern Hemisphere, the same thing happens only the stars appear to move a bit north as they rise and south as they set. If the star were to draw a line across the sky as it went, this line would be an arc, not a straight line.
And here is where an alt-az mount starts to have difficulties, particularly for photography. In order to move in such a way as to follow as star, or planet, or nebula, or any other astronomical body, the mount must move in both the altitude and azimuth axes at rates that are not only different from one another, but also vary depending on the object's location in the sky. Not only that, but they may change direction in the altitude axis - as they rise the altitude increases, as they set it decreases.
In order for an alt-az mount to "track" - follow - an object across the sky, it must be computerized. In mounts with this functionality, a computer maintains an internal mathematical model of the Earth and the sky. When you start up such a mount, the computer must be initialized (given starting values) for the time and date and its location on the surface of the earth (Latitude, Longitude, and Altitude). Once it knows where it is and what time and day it is, it can determine where everything in the sky should be relative to its position. It then must synchronize the calculated positions with its own orientation. This is typically done by identifying a handful of stars from a list of bright stars, pointing the telescope at one of the stars, and telling it what it's looking at. With two or three such stars, the mount should be relatively accurate and capable of slewing to a requested set of coordinates. To follow an object, once an object to follow is designated, it must then calculate what it's looking at and how it needs to move to follow the object. This calculation must be done every time it needs to move to follow the object - usually several times per second.
But there's a bit of a problem here: each calculation relies on the results of the previous calculation, which ultimately rely on the initial values entered during setup and alignment. If those values aren't accurate, neither will be the resulting calculation results. And the calculation errors can compound over time.
For the most part, alt-az telescopes simply lack the accuracy to do this well enough for photographic use. There are some exceptions. Imaging that does not require long exposures, such as planetary imaging, may be possible, and there are some very high-end systems that are accurate. These often are significantly more expensive and use computerized-pointing systems based on plate-solving and modeling the unique characteristics of the particular telescope and mount - something known as a Tpoint Model.
Another problem with alt-az mounts is a problem known as frame rotation. Frame rotation is the apparent rotation of an object in the field of view as it moves across the sky. To better understand this, consider the following: If you look at the Constellation Orion, the westernmost star on its belt (which rises before the other two belt stars) is named Mintaka. This star is nearly on the celestial equator. The bright star Betelgeuse, which is easily identified by its red-orange color, sits in Orion's eastern "shoulder" which is about seven and one-half degrees north of the equator, which puts it to the left of Mintaka as Orion is rising. The blue-white supergiant Rigel which forms the south-west most "toe" in the constellation is roughly 8 degrees south of the equator, putting it to the right of Mintaka when rising. If you follow the constellation across the sky until it sets, as it is setting you will notice that Betelgeuse is now to the right and Rigel to the left. Betelgeuse is still to the North, and Rigel to the South, but you have rotated 180 degrees to see them set. If you were to follow them the entire night through an alt-az telescope, you'd watch the stars appear to rotate in the field of view. In fact, you are the one rotating as you follow them.
For long exposure imaging, this is a major problem. There are devices available to rotate along with the object as you move across the night sky, but these tend to be somewhat expensive and are not in widespread use.
Overall, this makes alt-az mounts less suited for imaging, and not recommended for those interested in imaging. They are, however, easy to use and often less expensive than the alternative, making them a favorite among visual observers.
Level 2
LEVEL 3
Level 3
LEVEL 4
Level 4
LEVEL 5
Level 5